Genomic Data Reanalysis Request
How to sign in, raise a reanalysis request, and follow it through to a decision — screen by screen.
Document control
| Portal | request.int.liferaomics.com.sa |
|---|---|
| Form reference | LO-F-GR-01 — Genomic Data Reanalysis Request Form, Revision 1.1 |
| Audience | Requesting physicians and Lifera Omics laboratory staff |
| Screens shown | The live portal. All patient, physician and account details are synthetic demo data — no real patient information appears in this guide. |
| Replies to | request.reanalysis@liferaomics.com.sa |
| Document no. | assigned by QA |
Approval
| Role | Name | Signature | Date |
|---|---|---|---|
| Prepared byPortal author | |||
| Reviewed byLaboratory lead | |||
| Reviewed byQuality manager | |||
| Approved byLaboratory director |
Revision history
| Version | Date | Description of change | Author |
|---|---|---|---|
| 1.0 | date | Initial reanalysis request portal and short in-app guide. | name |
| 1.1 | 08 October 2026 | Illustrated user manual: annotated screenshots for sign-in and two-factor, the request form (sections 1–6), laboratory triage (sections 7–8), the auto-filed Jira ticket and account management; added quick reference and troubleshooting. | Medical Genomics |
Contents
Getting in
In this chapter you will learn to
- sign in with your username, password and authenticator code
- set your password the first time from an invitation email
- set up two-factor authentication
Access is limited to registered physicians and laboratory staff. Every account uses a password and a 6-digit code from an authenticator app. There is no self sign-up — the laboratory registers you, and you set your own password from an emailed link.
Where The portal address, before sign-in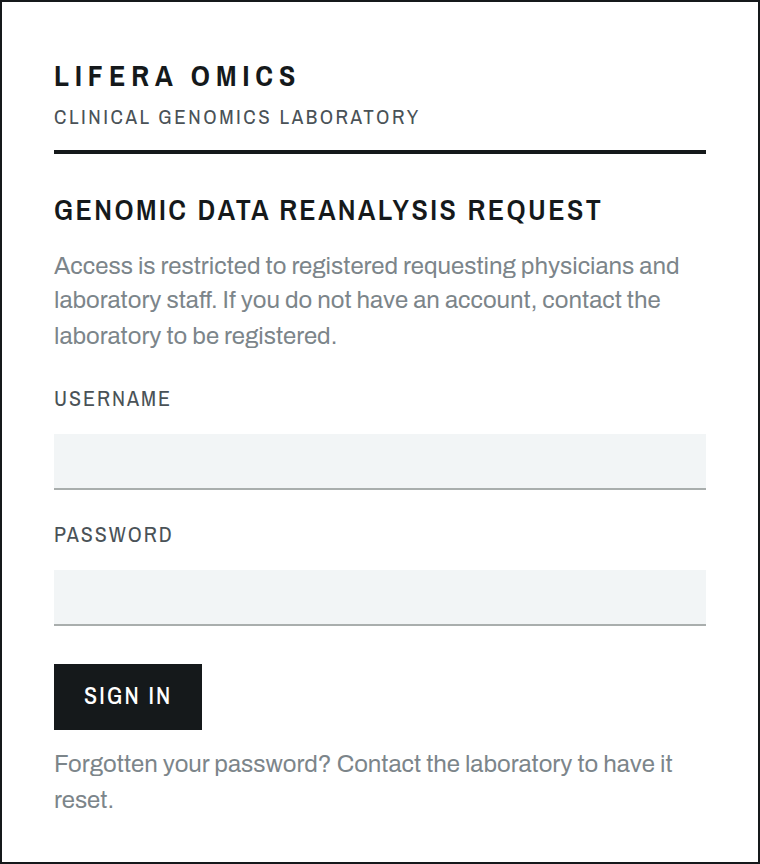 1
2
3
1
2
3
Figure A1. The sign-in screen.
- Username — the short name the laboratory gave you (e.g.
dr.ahmed), not an email. - Password — the password you set from your invitation link.
- Sign in — takes you to the two-factor step.
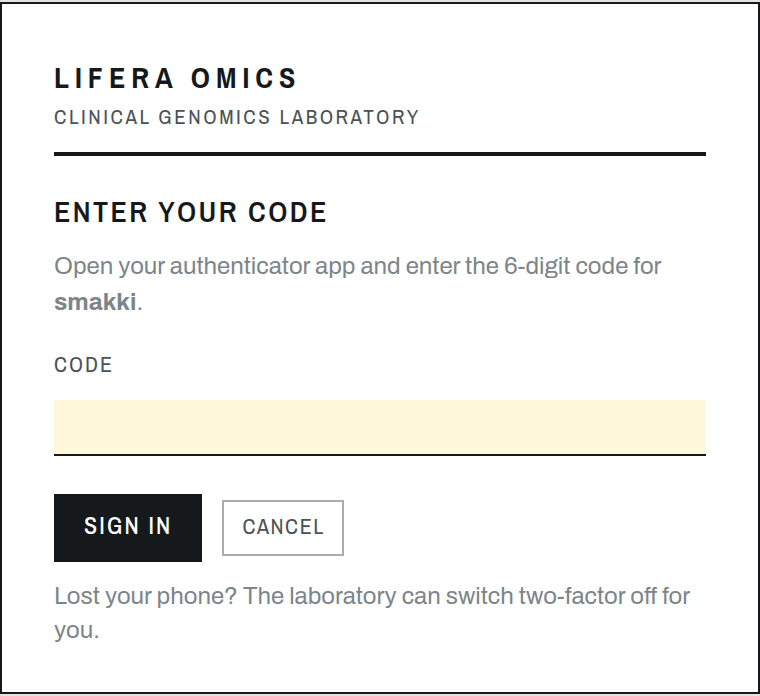 1
2
1
2
Figure A2. Entering your authenticator code.
- Code — the current 6-digit number from your authenticator app. It changes every 30 seconds.
- Sign in — confirms the code and opens the portal.
 1
2
3
4
1
2
3
4
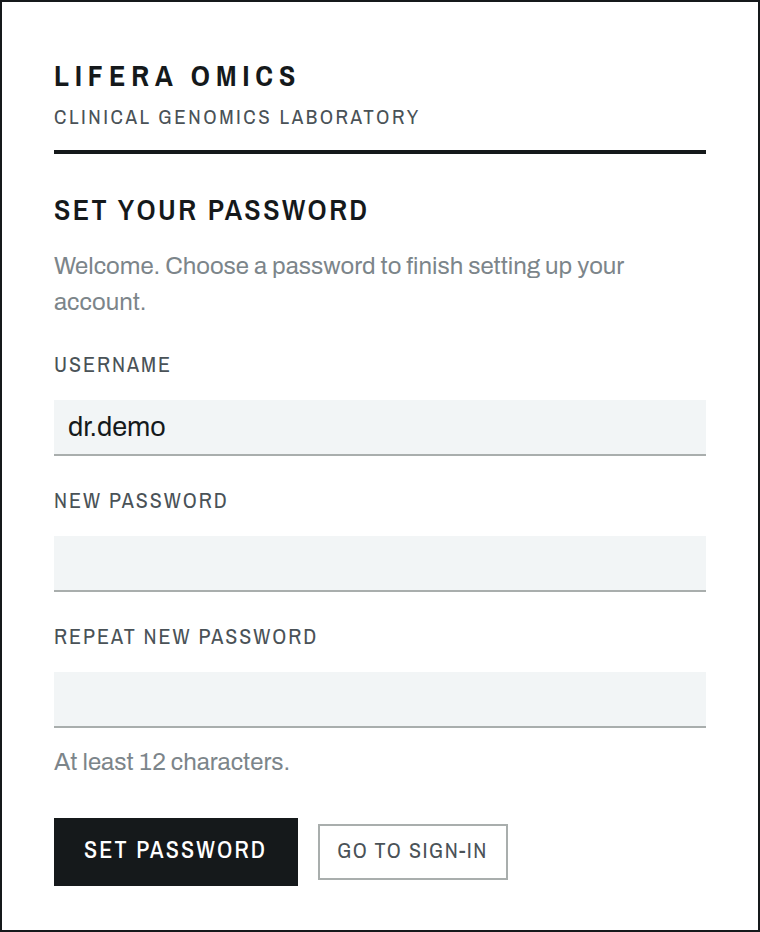
Figure A3. First time only — setting your password from the invitation email.
- Username — filled in for you.
- New password — at least 12 characters.
- Repeat — type it again to confirm.
- Set password — the link works once and expires after 72 hours.
 1
2
3
4
1
2
3
4
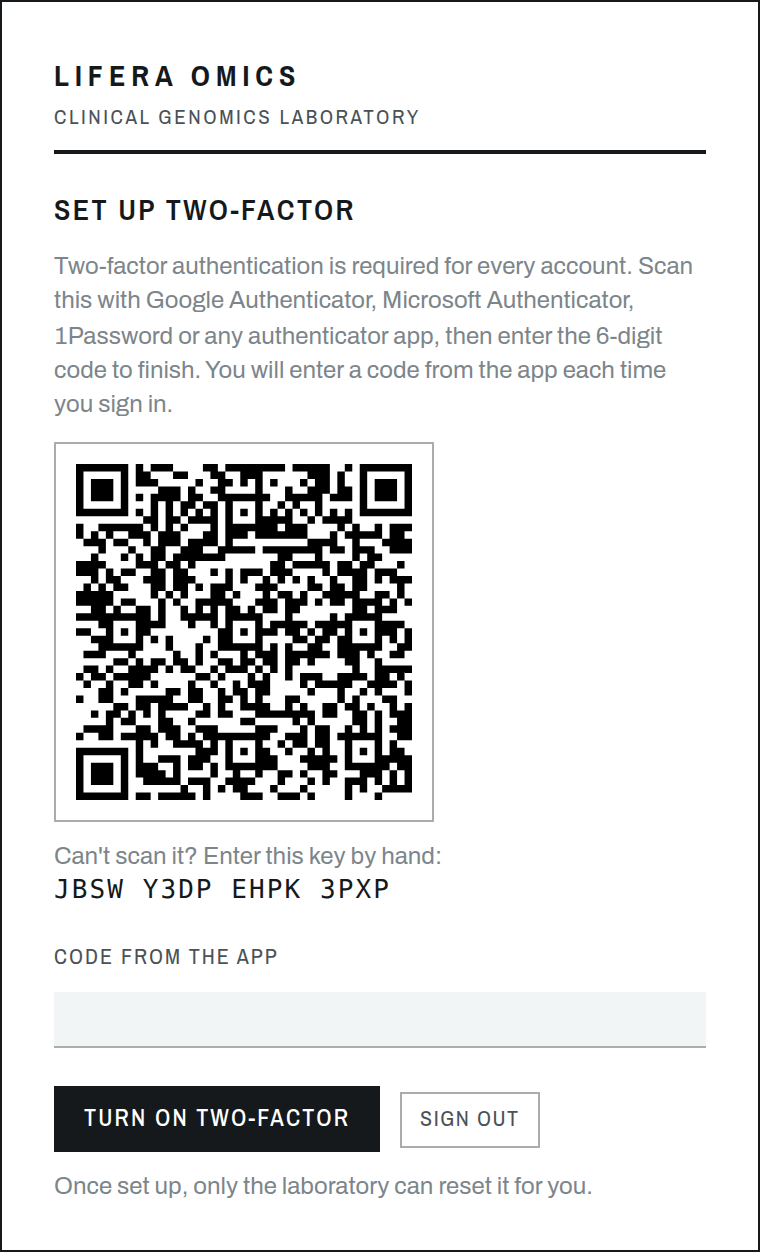
Figure A4. Setting up two-factor — required once, after your first sign-in.
- QR code — scan with Google/Microsoft Authenticator, 1Password or any app.
- Manual key — can't scan? Type this key in by hand.
- Code from the app — enter the 6-digit code it shows.
- Turn on two-factor — finishes setup.
Lost your phone?
The laboratory can switch two-factor off for you, so you can sign in with your password and set it up again.Around the portal
The top bar is on every screen. It switches between views, shows whether you're connected, and holds your account menu and the on-screen help.
Where Always visible once you are signed in 1
2
3
4
5
1
2
3
4
5
Figure B1. The top bar.
- Lifera Omics — the laboratory letterhead; you're on the reanalysis portal.
- Tabs — Request form, Requests (the register), Accounts (administrators only).
- Connection — green Connected means your work is being saved.
- Guide & theme — ? opens on-screen help; the half-circle switches light/dark.
- Your account — your name and role; opens the account menu.
 1
2
3
4
1
2
3
4
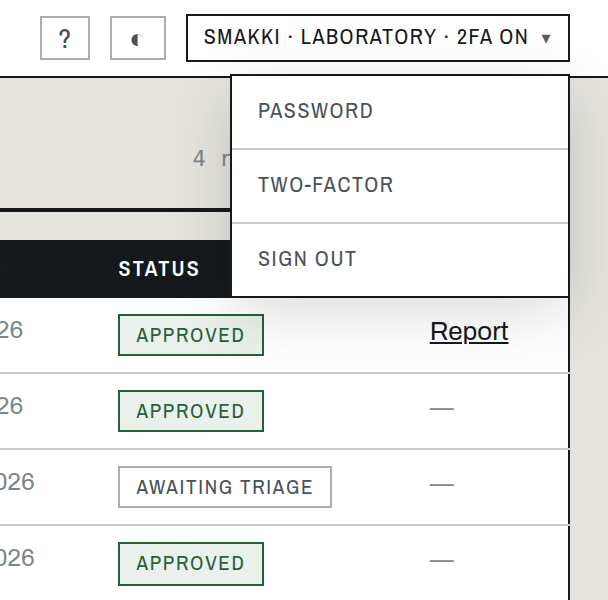
Figure B2. The account menu.
- Your account — click your name to open the menu.
- Password — change your password.
- Two-factor — check your authenticator status.
- Sign out — ends your session on this device.
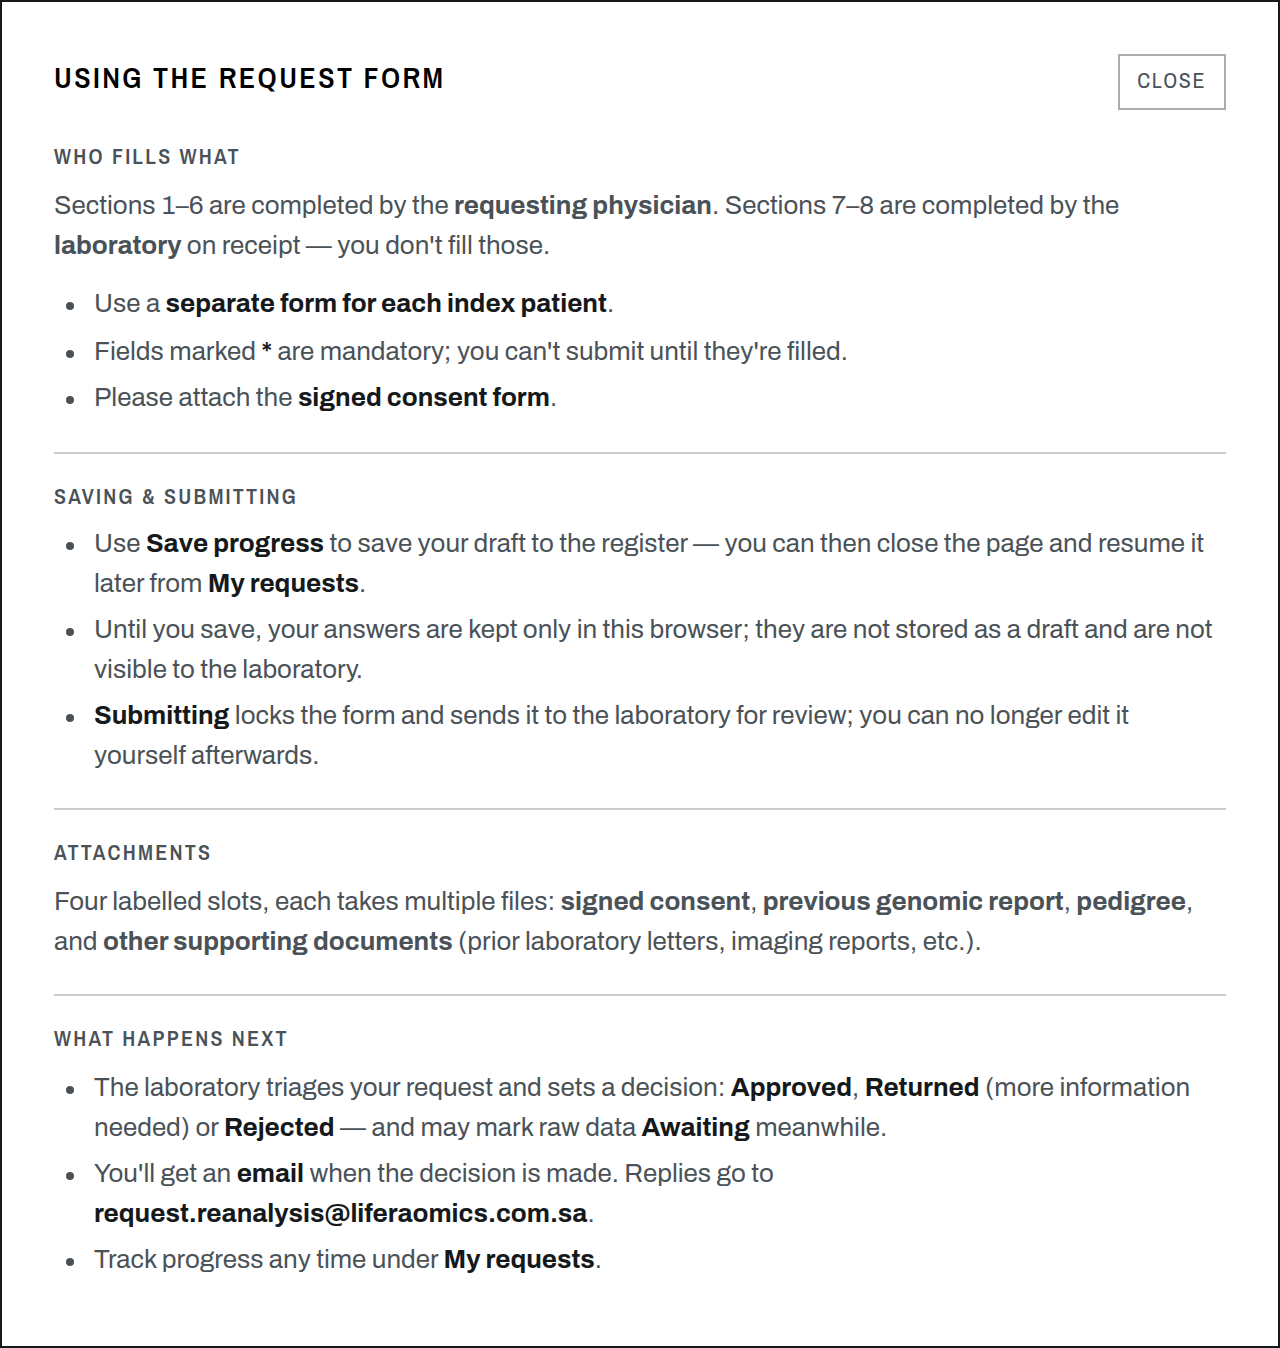
Figure B3. On-screen help.
The ? button opens short, context-aware help — it changes with the view you're in, so physicians and laboratory staff each see advice for what's in front of them.
The request form
In this chapter you will learn to
- read the form masthead and jump between sections
- complete sections 1–6 for the index patient
- attach documents, then save or submit
Physicians complete sections 1–6. Sections 7–8 belong to the laboratory and stay hidden on the form. Use a separate form for each index patient, attach the signed consent, and fill every field marked *.
Where The Request form tab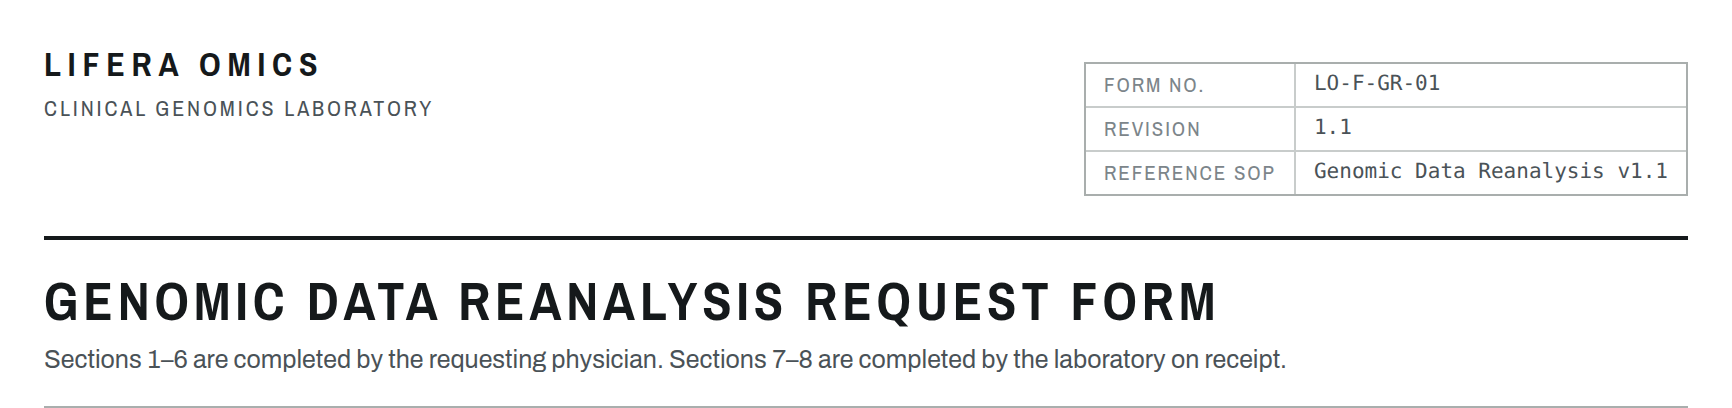 1
2
3
1
2
3
Figure C1. The form masthead.
- Document control — the form number, revision and SOP it follows.
- Form title — the Genomic Data Reanalysis Request Form.
- Who fills what — sections 1–6 physician; 7–8 laboratory, on receipt.
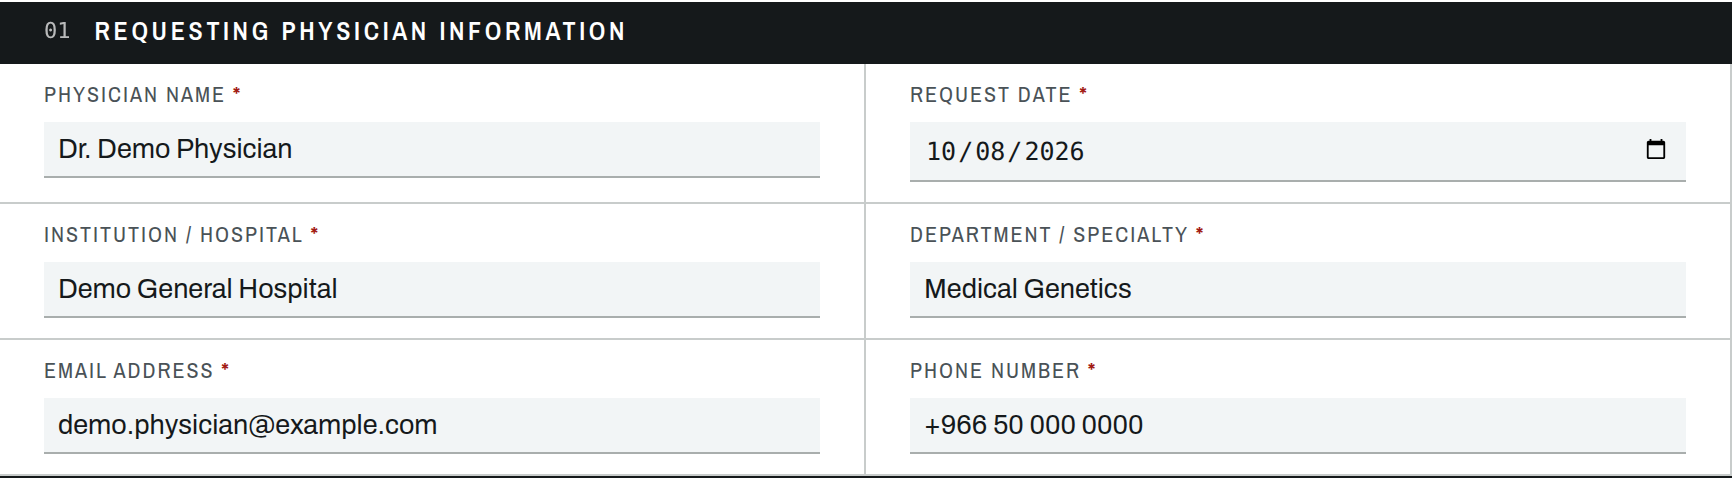
Figure C2. Section 1 — Requesting physician. Your name, institution, department and contact details. The email and phone are where the laboratory reaches you.
 1
2
1
2
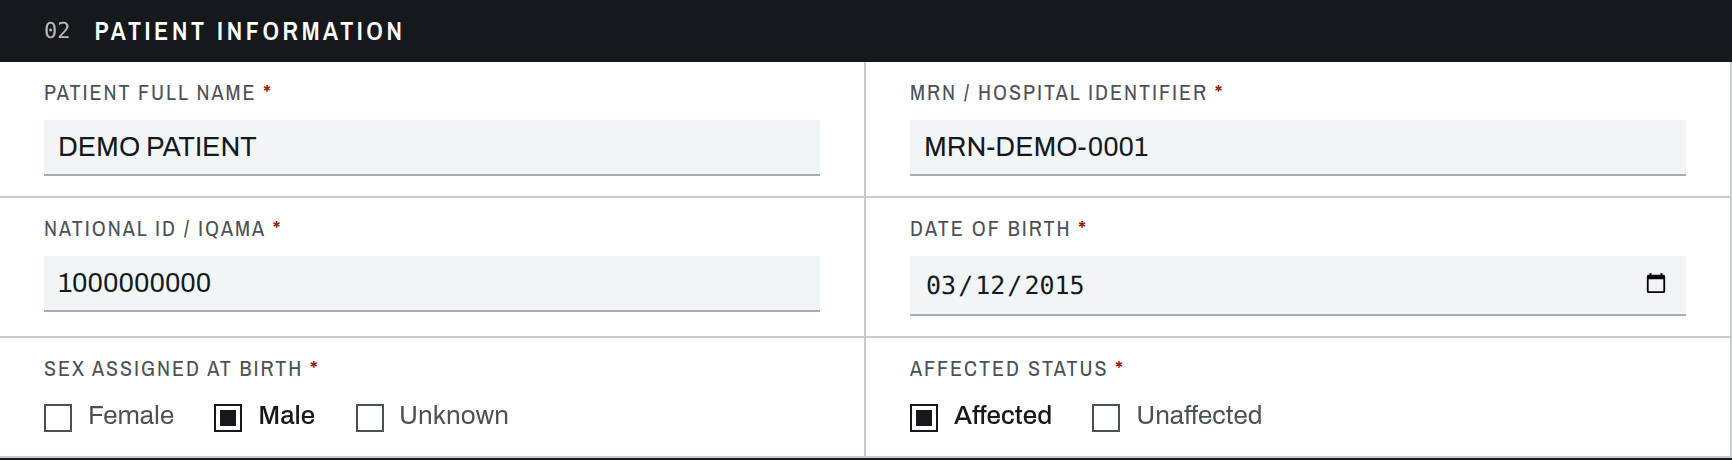
Figure C3. Section 2 — Patient information. Identify the index patient.
- Sex assigned at birth — Female, Male or Unknown.
- Affected status — Affected or Unaffected.
 1
2
3
4
5
1
2
3
4
5
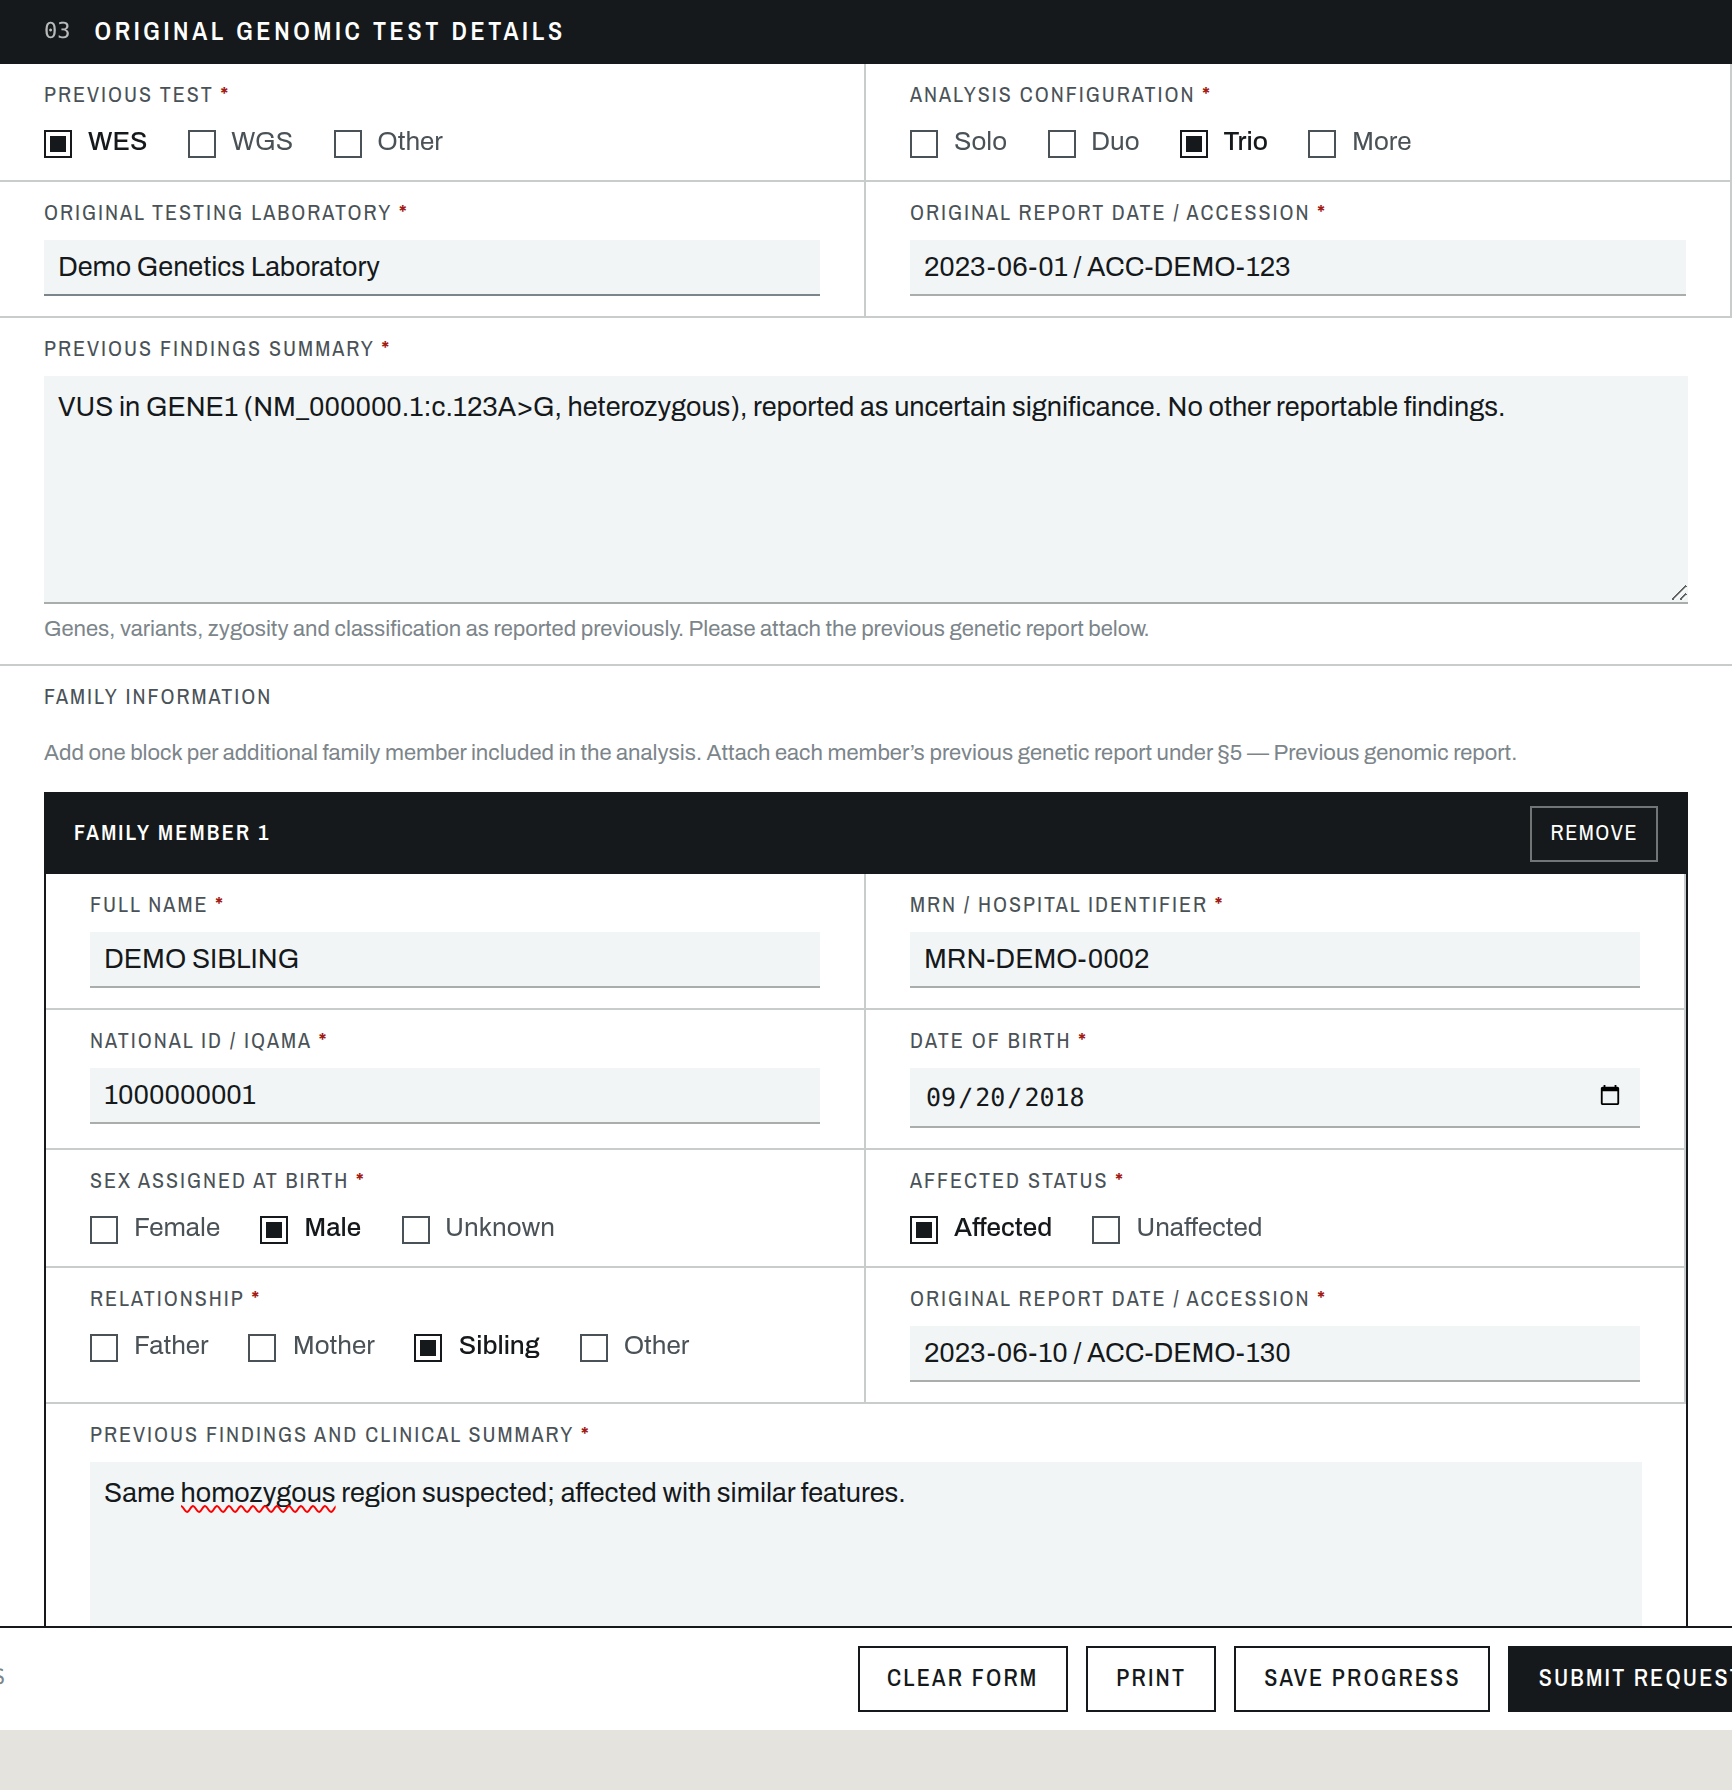
Figure C4. Section 3 — Original genomic test.
- Previous test — WES, WGS, or Other.
- Analysis configuration — Solo, Duo, Trio or More.
- Previous findings — genes, variants, zygosity and classification as reported before.
- Family members — when the configuration is not Solo, a block appears per relative.
- Add / Remove — one block per family member; fill every field.
 1
2
1
2
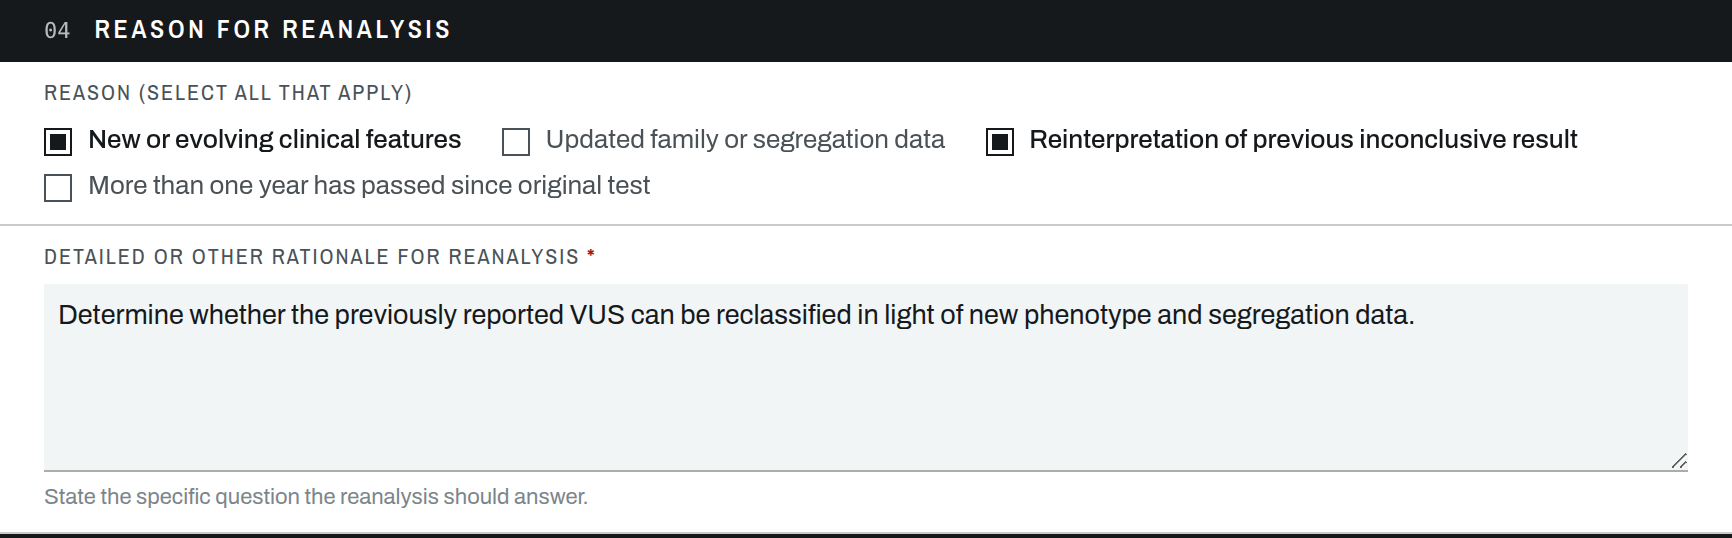
Figure C5. Section 4 — Reason for reanalysis.
- Reasons — tick all that apply.
- Rationale — the specific question the reanalysis should answer.
 1
2
3
4
5
1
2
3
4
5
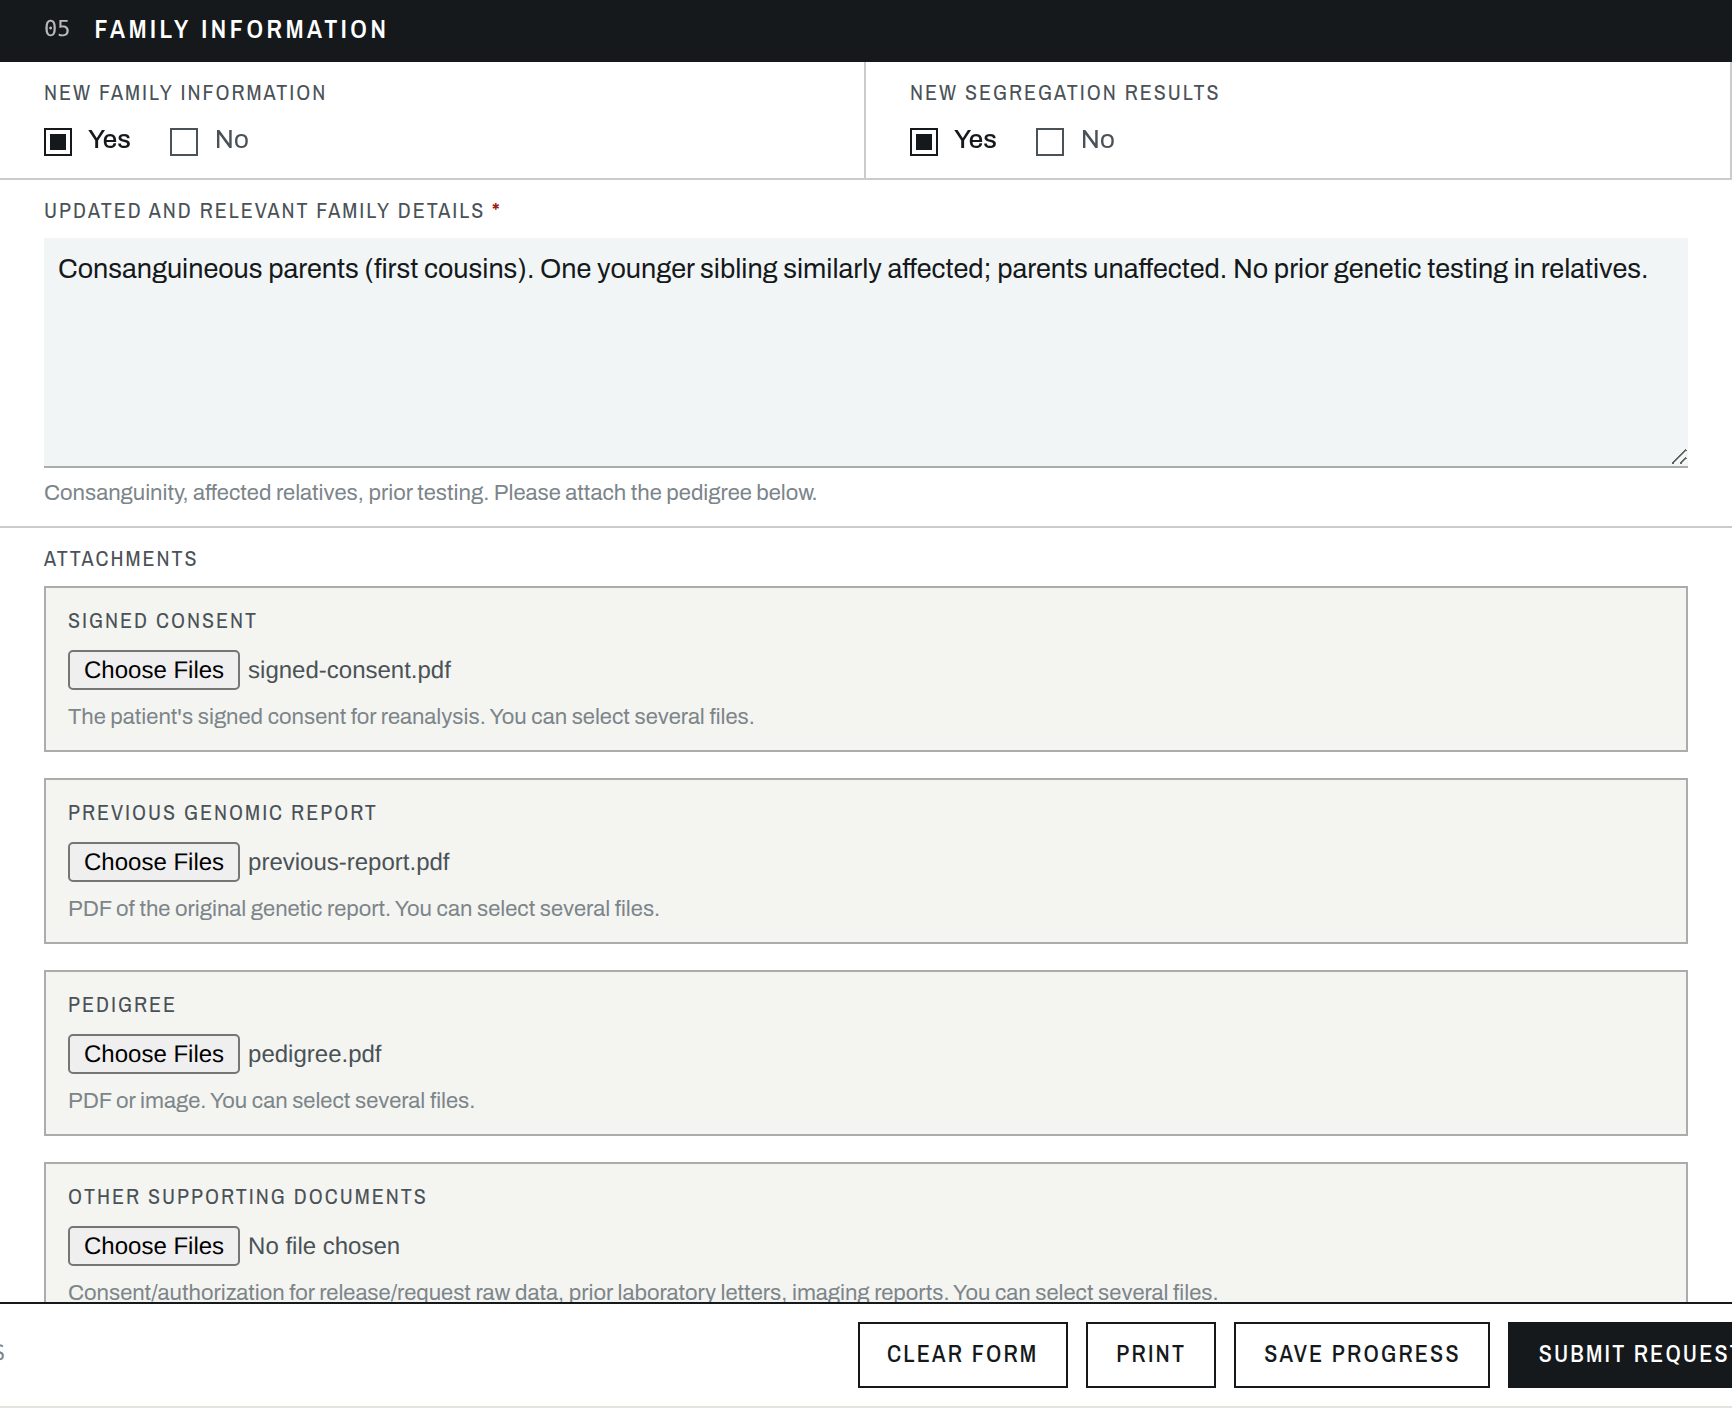
Figure C6. Section 5 — Family information & attachments.
- New family information — Yes or No.
- New segregation results — Yes or No.
- Family details — consanguinity, affected relatives, prior testing.
- Attachments — four slots: consent, previous report, pedigree, other.
- Choose files — visible to the laboratory only.
 1
2
3
4
5
1
2
3
4
5
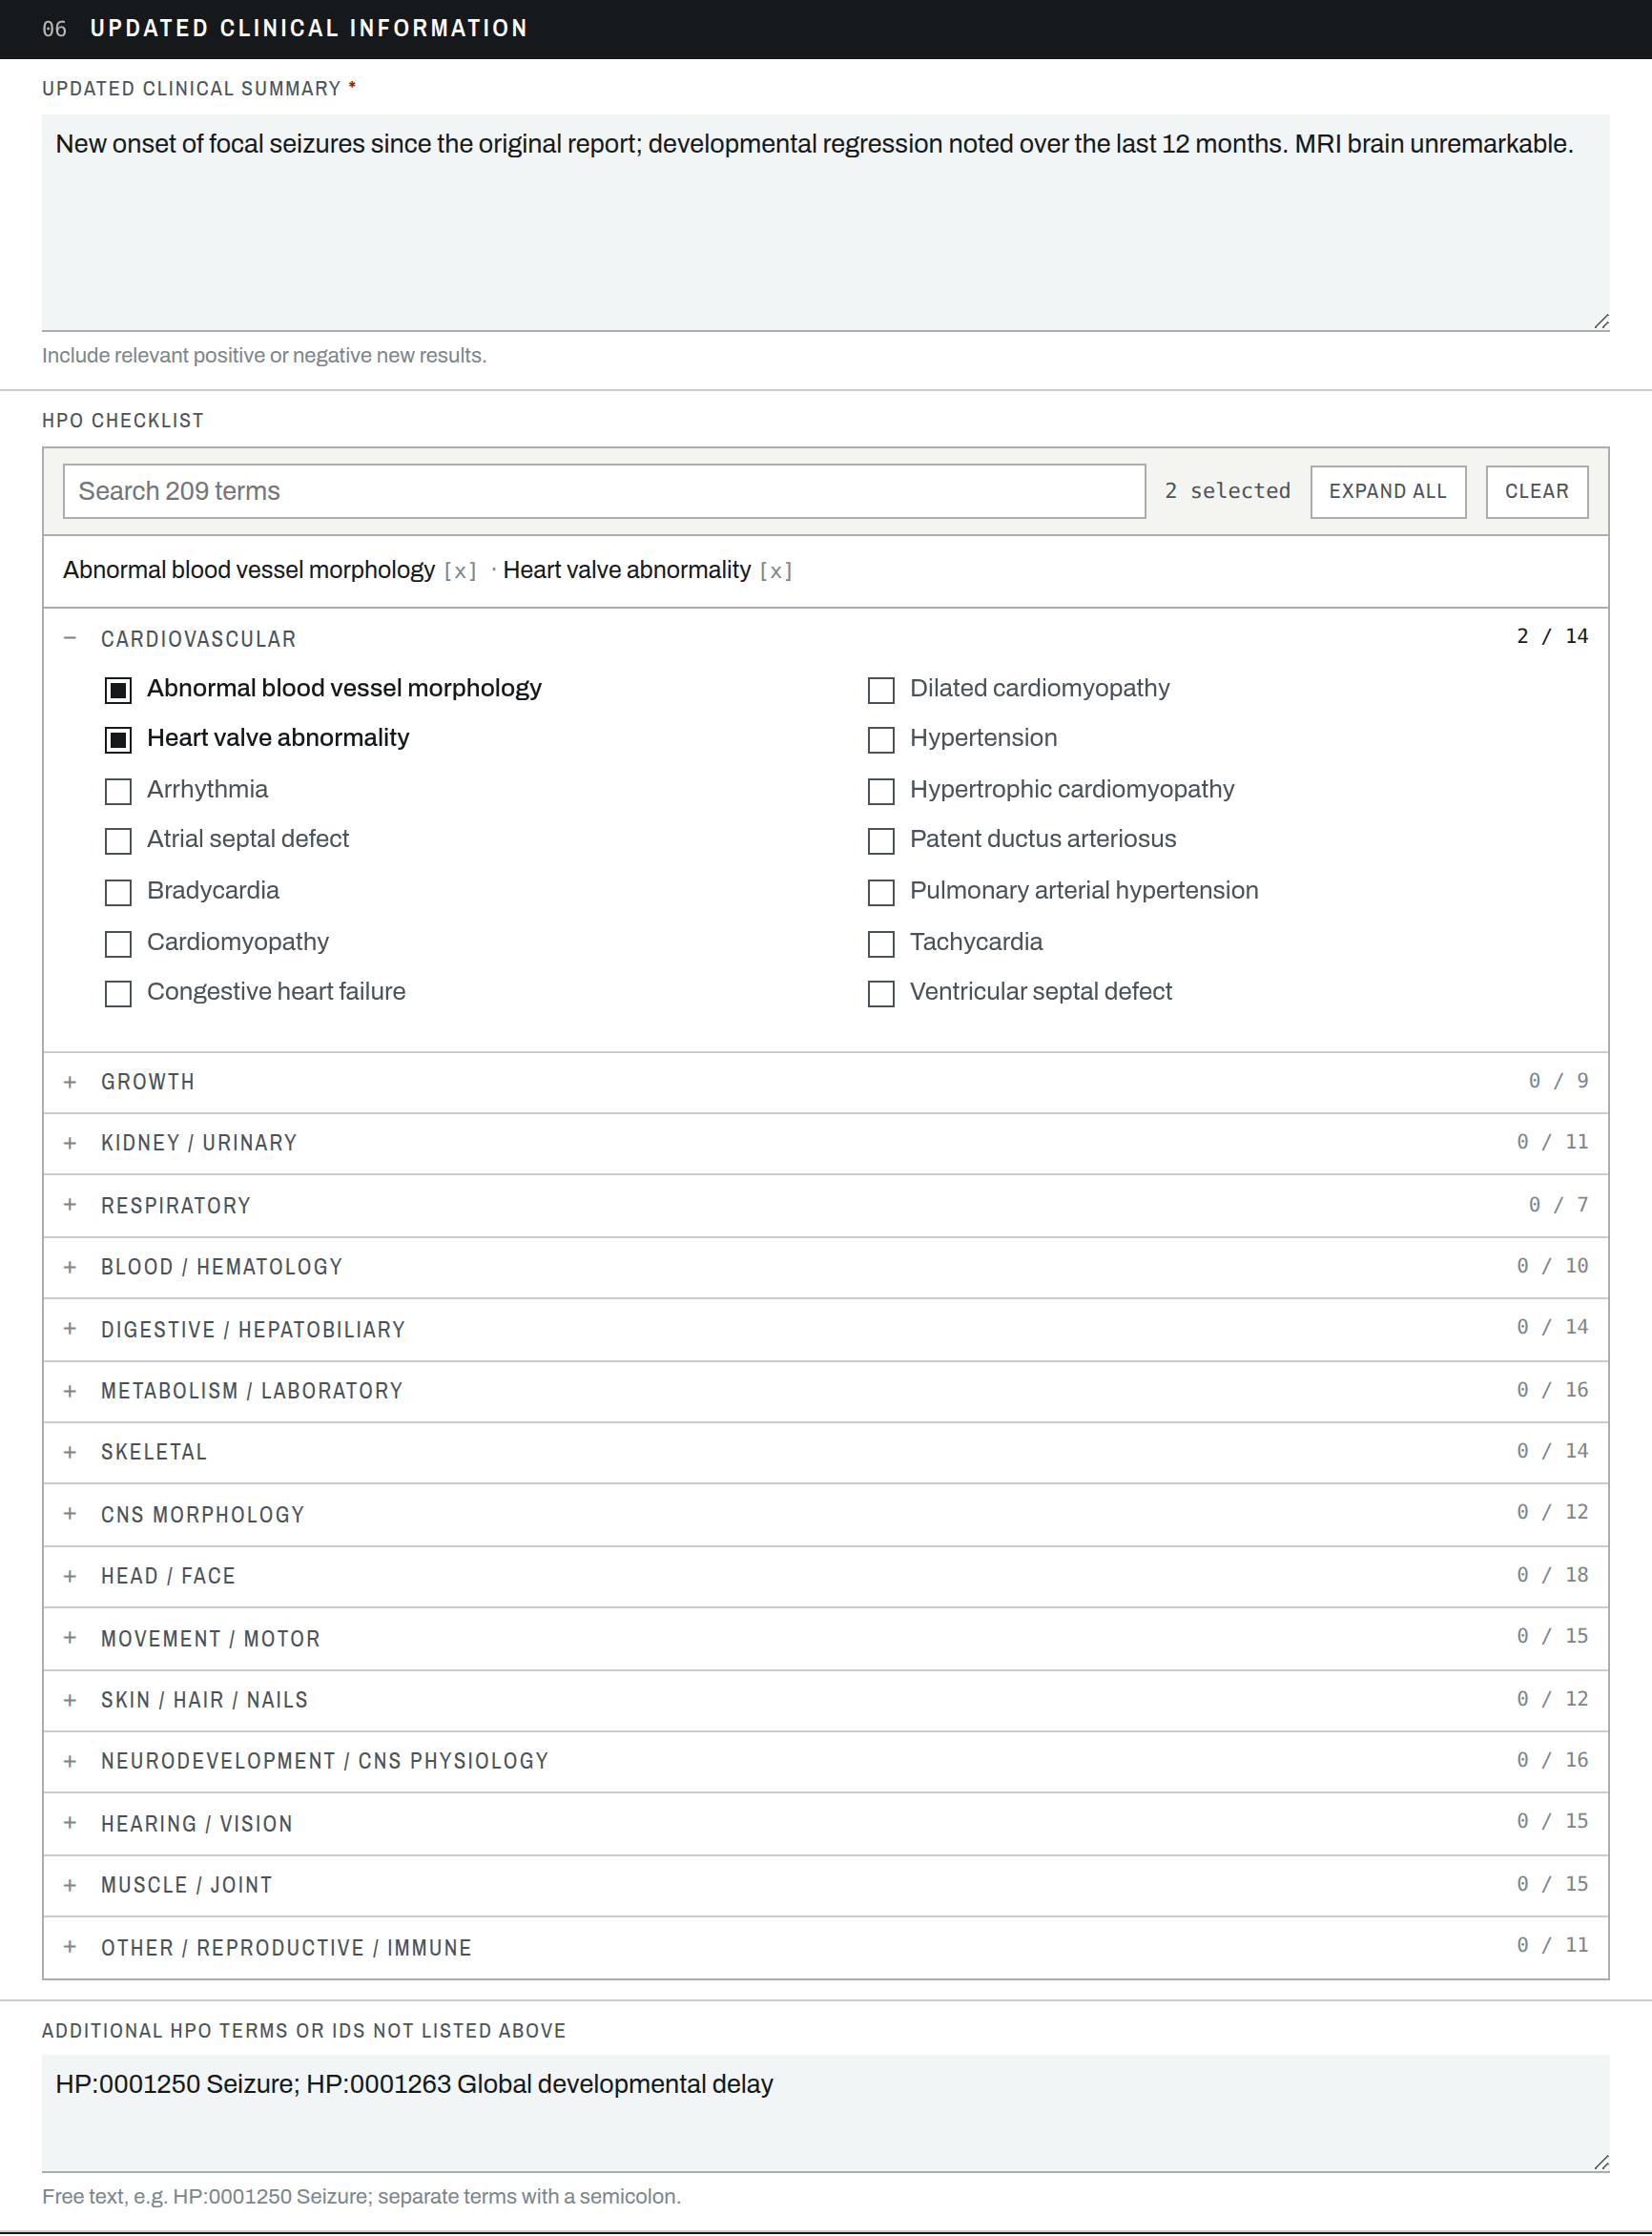
Figure C7. Section 6 — Updated clinical information.
- Clinical summary — relevant new results, positive or negative.
- Search 209 terms — find HPO phenotype terms.
- Selected — running count and chips (remove with
[x]). - Categories — open one and tick terms; Expand all / Clear help.
- Additional HPO — free text (e.g.
HP:0001250 Seizure).
 1
2
3
4
1
2
3
4
Figure C8. The action bar, fixed at the bottom of the form.
- Clear form — empties the form to start fresh.
- Print — a clean printable copy.
- Save progress — saves a draft to the register so you can finish later. Until you save, answers live only in this browser.
- Submit request — sends it to the laboratory and locks it; you can't edit it yourself afterwards.
Save or submit?
Save progress keeps a private draft you can return to. Submit request hands it to the laboratory — do this only when the form is complete.Submitting & tracking
Submitted and saved requests live in the register. Physicians see their own; the laboratory sees every one. You're emailed whenever a decision changes — replies go to request.reanalysis@liferaomics.com.sa.
Where The Requests tab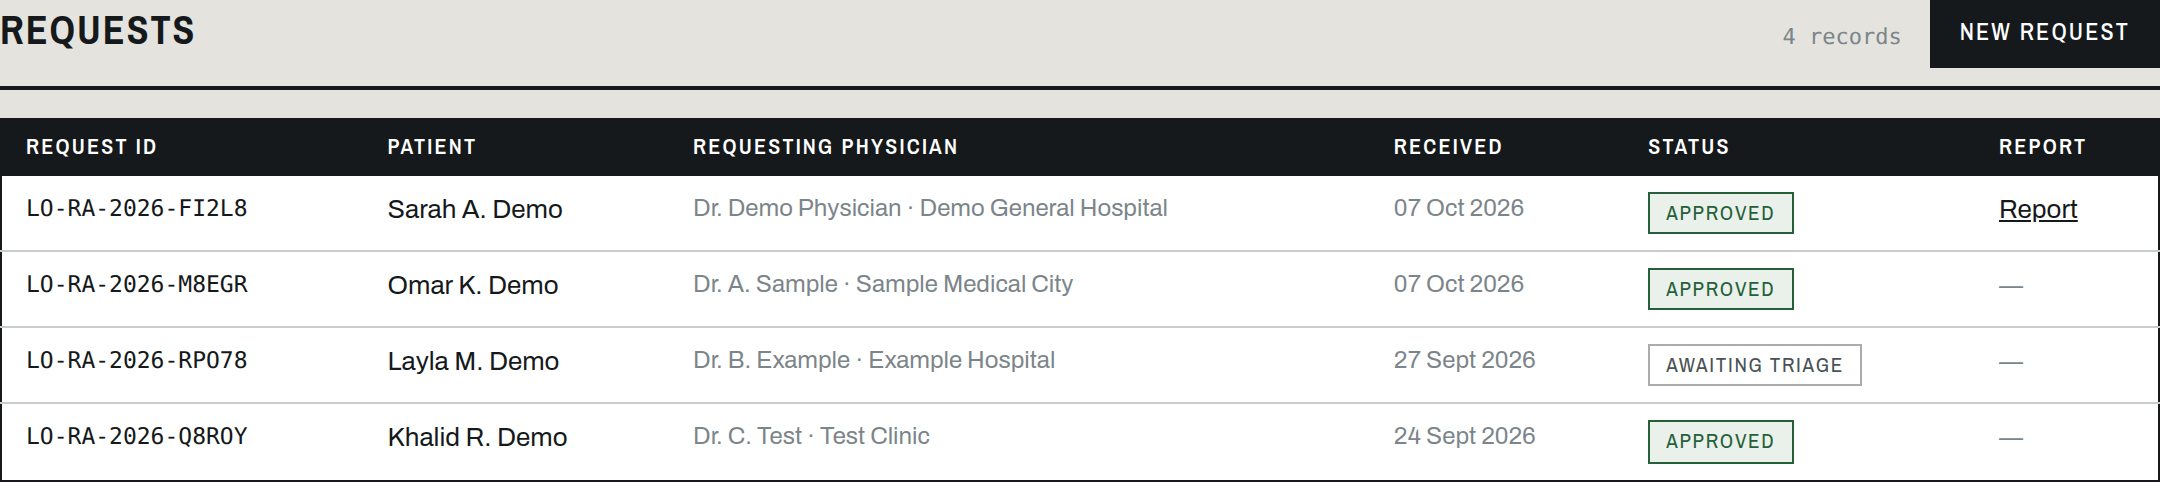 1
2
3
4
5
6
7
1
2
3
4
5
6
7
Figure D1. The requests register. Click any row to open it.
- Request ID — the portal's reference.
- Patient — the index patient's name.
- Requesting physician — who raised it, and where.
- Received — when it was submitted.
- Status — where it stands (key below).
- Report — a download link once released.
- New request — start a fresh form.
 1
2
3
1
2
3
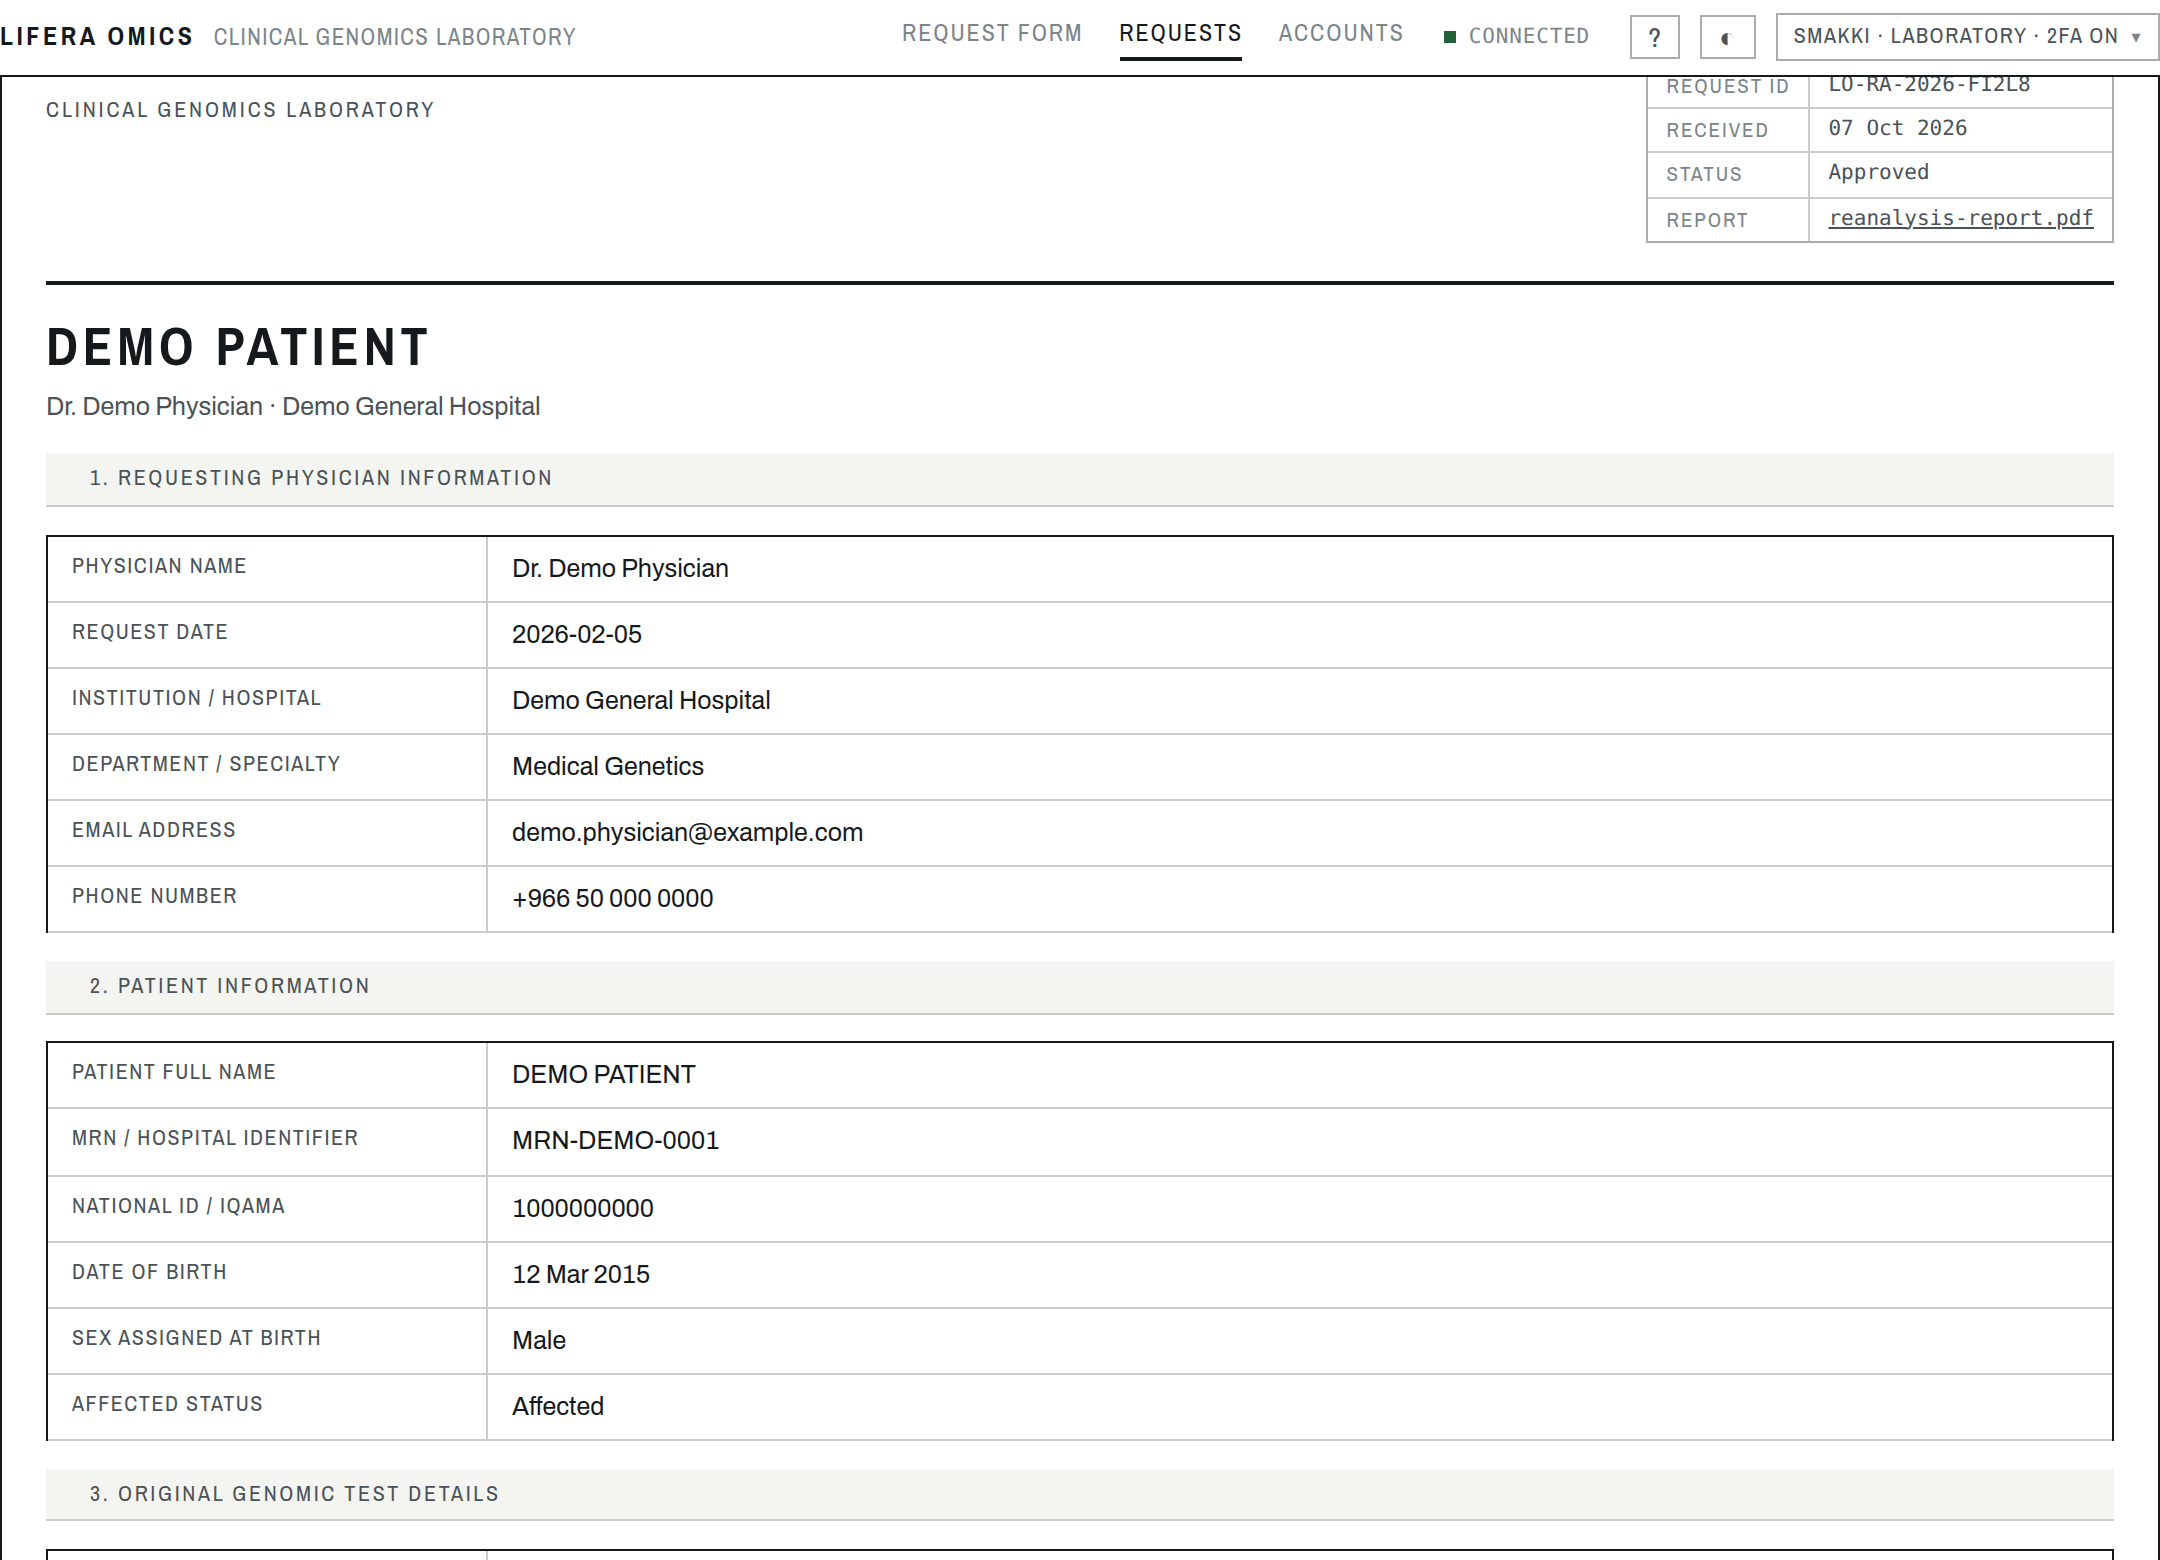
Figure D2. A request opened from the register.
- Request details — ID, received date, status and, once released, the report.
- Patient & physician — the index patient with the requesting physician and institution.
- The answers — sections 1–6 read-only. A Returned request shows Edit & resubmit here.
Laboratory triage
In this chapter you will learn to
- complete section 7 triage and record a decision
- read the auto-computed readiness checklist
- recognise the Jira ticket the portal files automatically
These sections are visible to laboratory staff only, inside an opened request.
Where Open a request · laboratory accounts only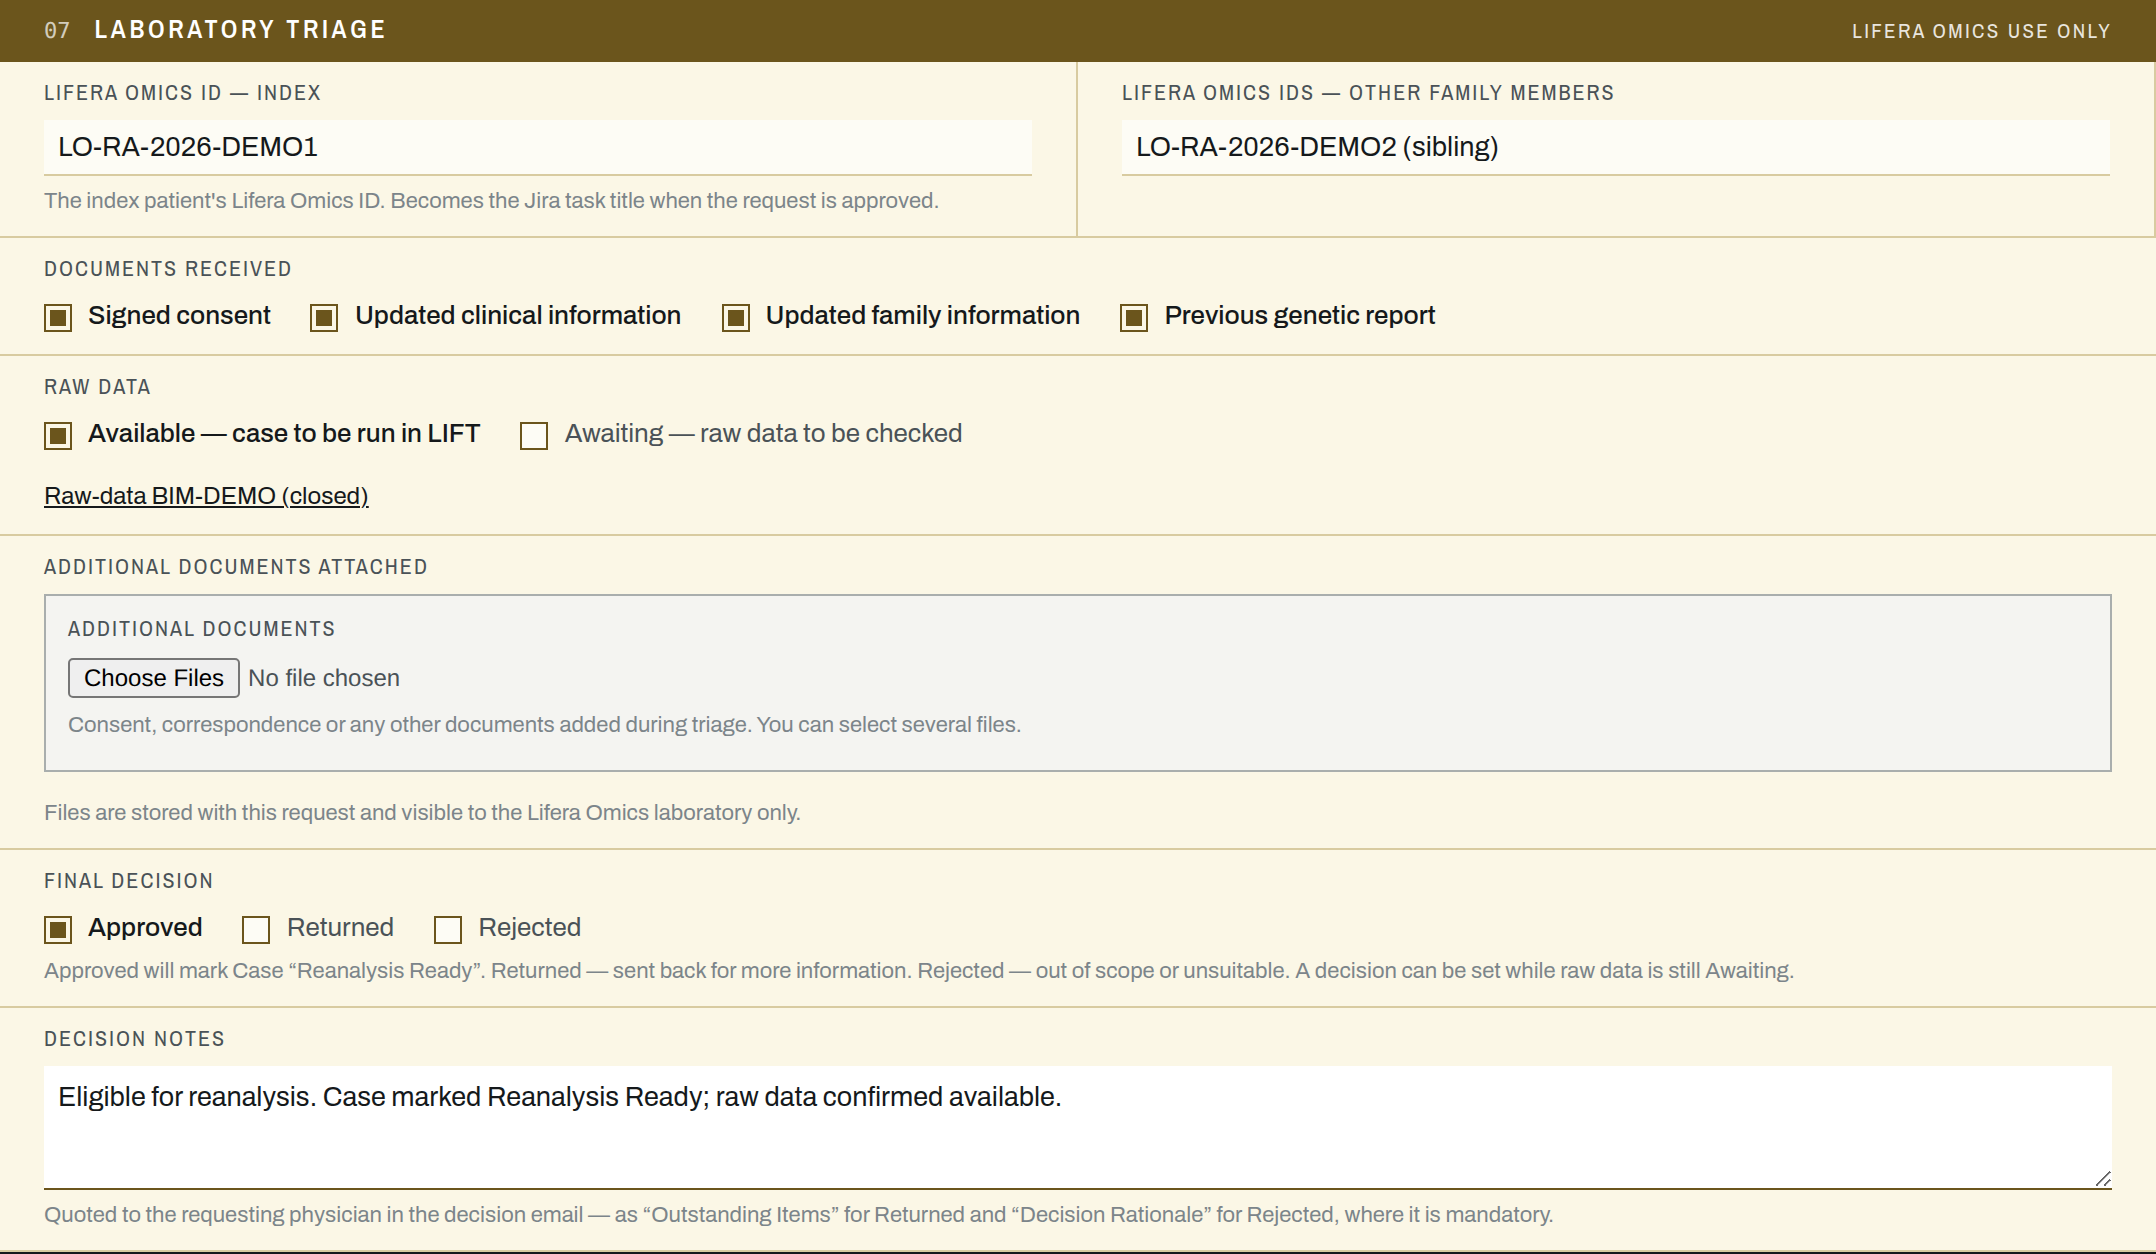 1
2
3
4
5
6
1
2
3
4
5
6
Figure E1. Section 7 — Laboratory triage.
- Index Lifera Omics ID — becomes the Jira task title on approval.
- Other IDs — lab IDs for other family members.
- Documents received — consent, clinical, family, previous report.
- Raw data — Available or Awaiting. Check files a raw-data ticket; marking it Available later closes that ticket.
- Final decision — Approved marks the case Reanalysis Ready and files the run ticket.
- Decision notes — emailed to the physician; mandatory for Returned/Rejected.
Emails on change only
Saving with a decision selected emails the physician — but only when the decision changes, so re-saving the same decision won't re-send.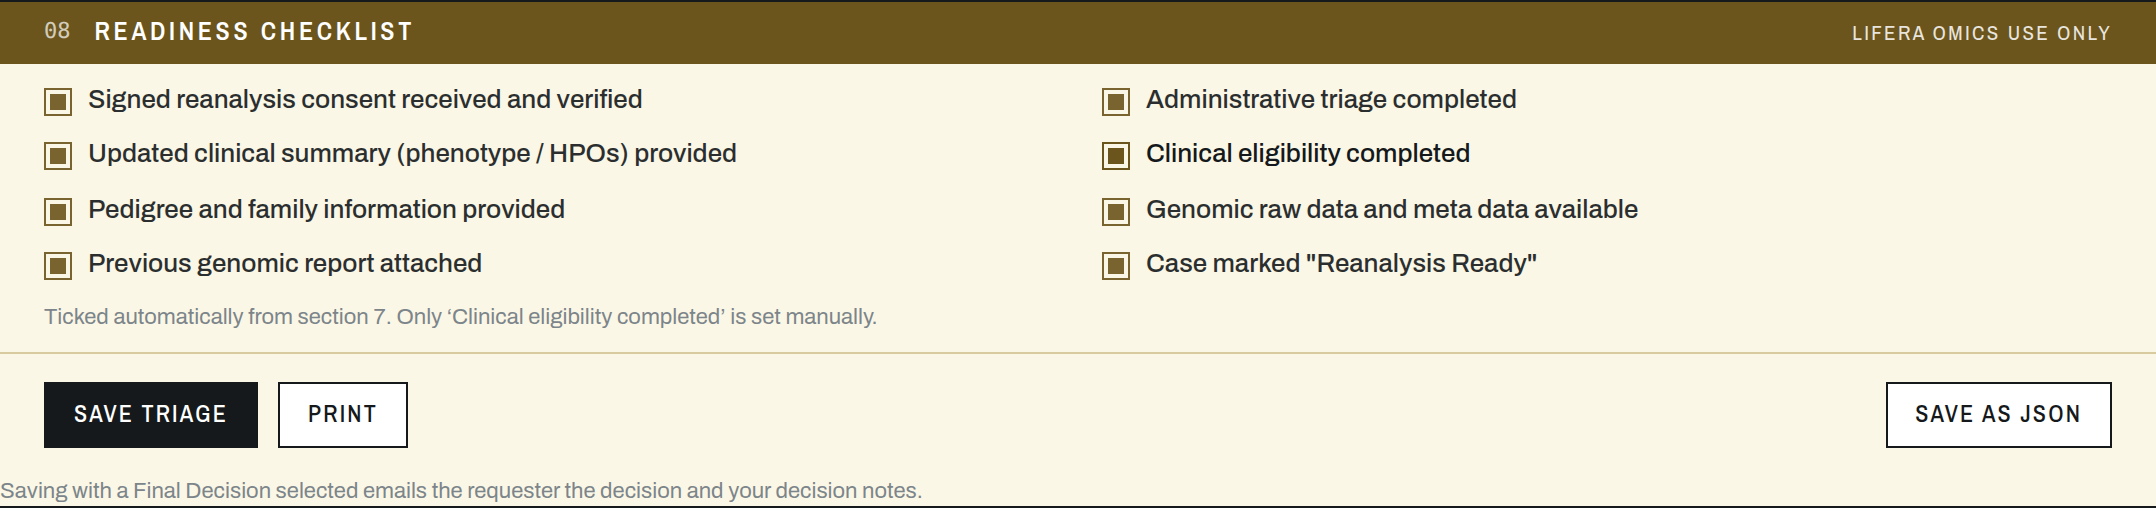 1
2
3
4
1
2
3
4
Figure E2. Section 8 — Readiness checklist.
- Auto-ticked items — filled from section 7 automatically.
- Clinical eligibility — the one item ticked manually.
- Save triage — records it and sends any decision email.
- Print / Save as JSON — a printable copy, or the full record.
 1
2
3
1
2
3
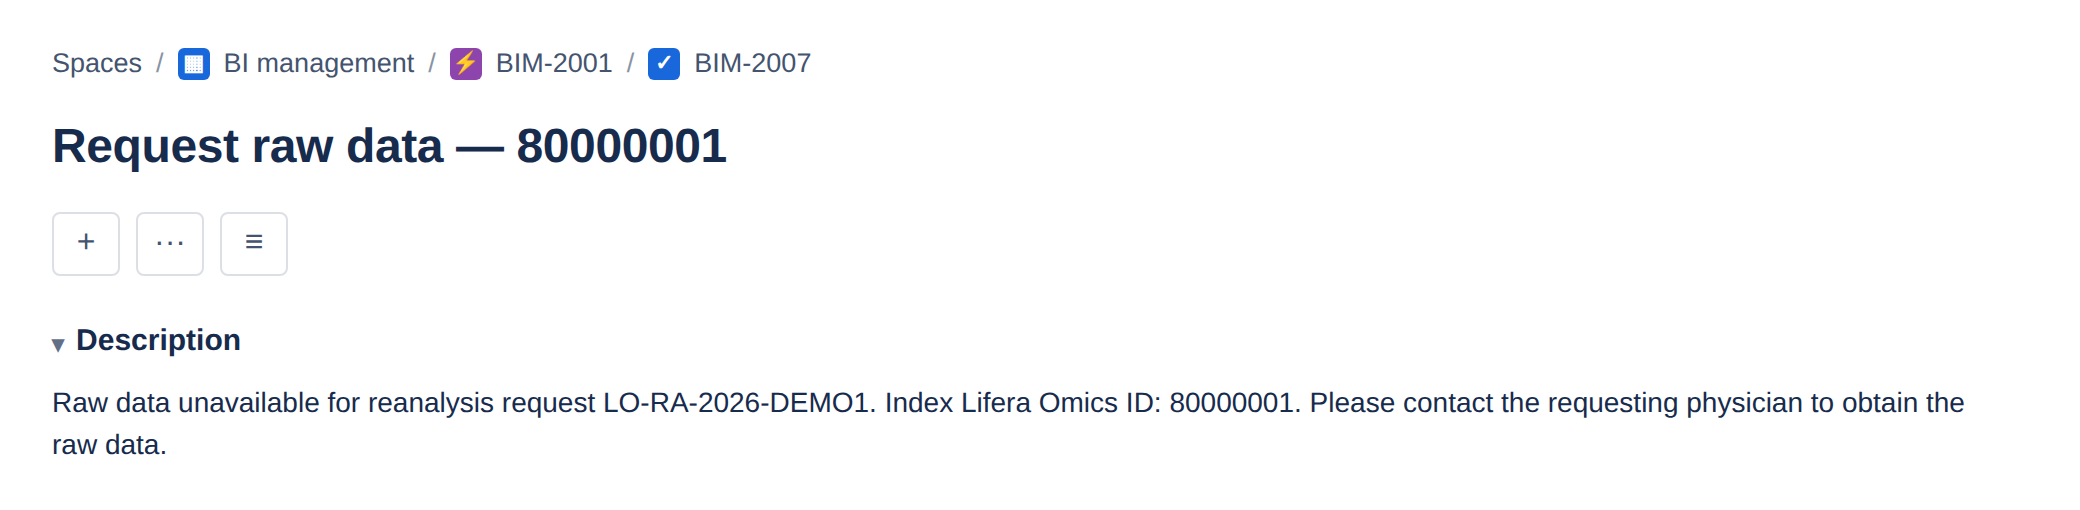
Figure E3. The ticket the portal files in Jira automatically (demo IDs).
- Where it lands — under the operations epic, in a story for the month.
- Title — the index Lifera Omics ID, or “Request raw data — <ID>”.
- Description — the request reference and index ID only. No patient-identifiable information is put in Jira.
Managing accounts
The Accounts tab is for administrators. It is where physicians and laboratory staff are registered and managed. No one signs up on their own.
Where The Accounts tab · administrators only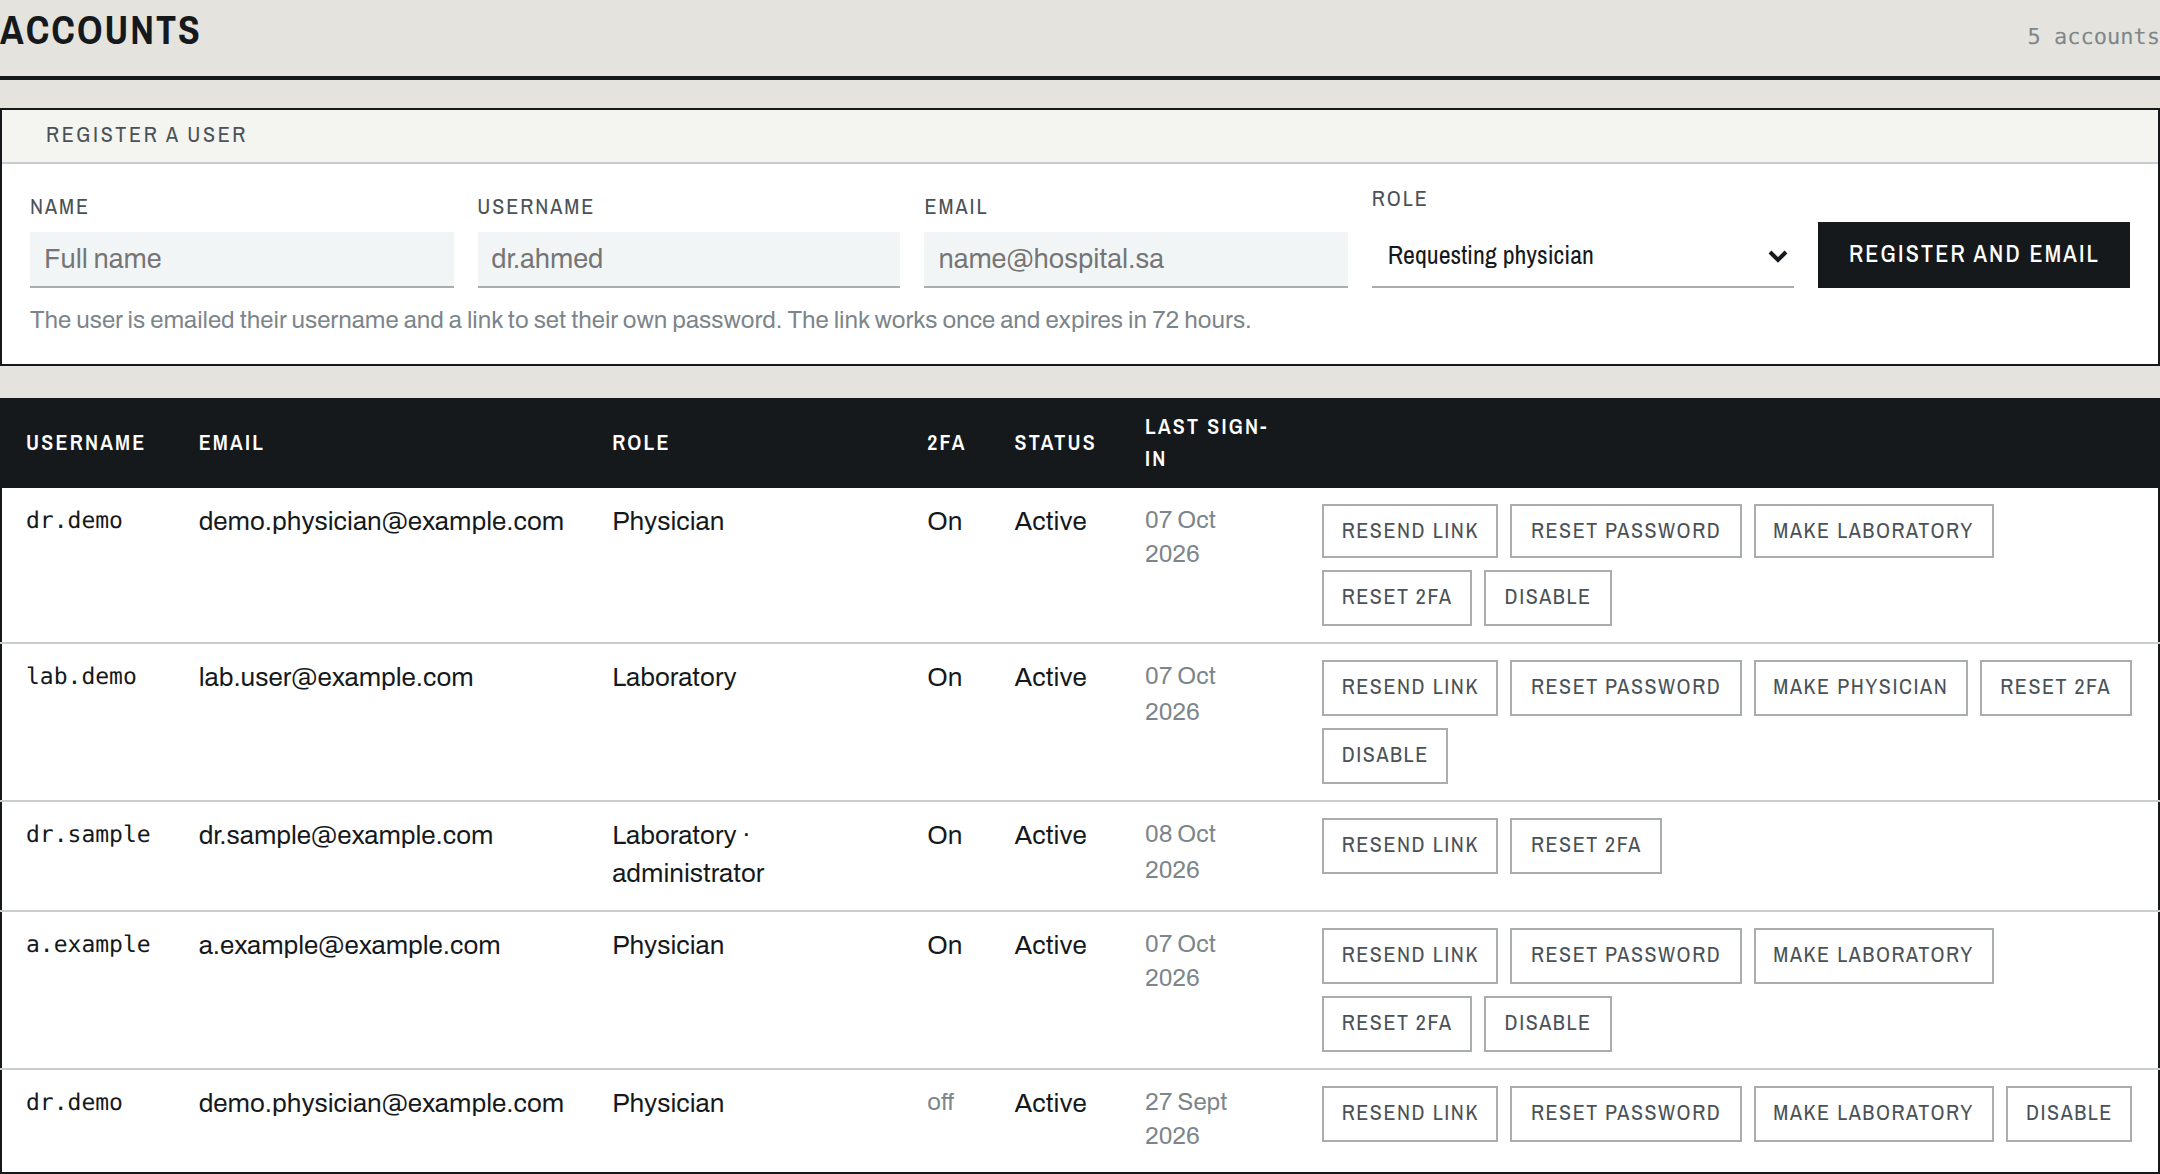 1
2
3
4
1
2
3
4
Figure F1. Accounts (administrators only).
- Register a user — name, username, email and role (physician or laboratory).
- Register and email — creates the account and emails a one-time link (72 hours).
- The account list — everyone registered, with role, two-factor, status and last sign-in.
- Row actions — resend link, reset password, change role, reset two-factor (lost device), or disable.
Quick reference
Form sections at a glance
Sections 1–6 are the physician's; 7–8 are the laboratory's.
| Section | Completed by | Covers |
|---|---|---|
| 1 · Requesting physician | Physician | Name, institution, department, email and phone. |
| 2 · Patient information | Physician | Index patient: name, MRN, National ID / Iqama, DOB, sex, affected status. |
| 3 · Original genomic test | Physician | Previous test (WES/WGS), analysis configuration, original lab, report date, previous findings, family members. |
| 4 · Reason for reanalysis | Physician | Reasons (tick all that apply) and the rationale. |
| 5 · Family information & attachments | Physician | New family info, segregation, family details, and four attachment slots. |
| 6 · Updated clinical information | Physician | Updated clinical summary, HPO checklist (209 terms), additional HPO. |
| 7 · Laboratory triage | Laboratory | Index / other IDs, documents received, raw-data status, final decision, notes. |
| 8 · Readiness checklist | Laboratory | Auto-computed readiness; Approved marks the case Reanalysis Ready. |
Request statuses
| Status | Meaning | Who acts next |
|---|---|---|
| Draft | Saved but not submitted. | Physician finishes and submits. |
| Awaiting triage | Submitted; not reviewed yet. | Laboratory triages the request. |
| Awaiting raw data | Accepted; pending the genomic raw data. | Laboratory / data team. |
| Approved | Accepted for reanalysis. | Laboratory runs the case. |
| Returned | More information needed. | Physician edits and resubmits. |
| Rejected | Not accepted (reason in the email). | — |
Buttons & actions
| Control | Where | What it does |
|---|---|---|
| Save progress | Request form | Saves a private draft to the register so you can finish later. |
| Submit request | Request form | Sends the request to the laboratory and locks the form. |
| New request | Requests | Starts a fresh form. |
| Check | §7 · Raw data | Files a raw-data request ticket for the data team. |
| Save triage | §7 / §8 | Records the triage and emails the decision (when it changes). |
| Edit & resubmit | A Returned request | Physician revises the answers and sends them back. |
| Edit answers | Open request · lab | Laboratory corrects a submission; the change is logged. |
| Release report | Open request · lab | Uploads the final PDF and emails the physician it is ready. |
| Register and email | Accounts · admin | Creates an account and emails a one-time set-password link. |
Troubleshooting
| What you see | Likely cause | What to do |
|---|---|---|
| “Invalid username or password”. | Wrong username or password. | Usernames are not emails. If forgotten, contact the laboratory to have it reset. |
| The 6-digit code is rejected. | The code expired or was mistyped. | Enter the current code (it changes every 30 seconds). Still failing? Re-enter your password to get a fresh attempt. |
| Can't sign in after changing phone. | Two-factor is tied to the old device. | Ask the laboratory to switch two-factor off; sign in with your password and set it up again. |
| The invitation link doesn't work. | It was already used, or is older than 72 hours. | Ask the laboratory to resend the link. |
| Submit request does nothing. | A mandatory field (*) is empty. | Fill every field marked *; the form flags the ones that are missing. |
| My draft isn't in the register. | It was never saved — answers were kept only in this browser. | Open the form and use Save progress. Drafts are private to you until you submit. |
| I can't see sections 7–8. | They are laboratory-only. | Physicians don't fill triage; the laboratory completes it after your request arrives. |
| No decision email arrived. | The decision hasn't changed, or the email on file is wrong. | Email sends only when the decision changes. Check spam, and confirm your email with the laboratory. |
| Save triage is blocked. | Returned or Rejected was chosen without decision notes. | Enter decision notes — they are quoted to the physician. |
| The connection dot is not green. | The link to the request store dropped. | Check your network and reload; don't submit until it shows Connected. |